Here’s a simple 4-step process that might help.
Before You Start
During the process, you’ll be using an Excel spreadsheet to gather data. You can download the blank spreadsheet from [here], or the example shown below from [here] – about 25kB in each case.
Step 1 – How Much Time Do You Have?
Let’s start with a quick and simple question. Do you have an hour to present, 45 minutes, or maybe only 30 minutes? Be very careful to check whether a 9am to 10am slot in a timetable really means 60 minutes in the classroom, or whether it’s generally understood to mean 50 minutes.
Enter this value (in minutes) into the spreadsheet in line S1.
Step 2 – Administrative Time – The Intro and The Outro
There are certain amounts of time that you’re going to have to budget for administrative matters.
- Allow time for students to arrive, get seated and settle down. Typically I’d allow 5 minutes for this, but you may want to allow more if your students are arriving from other buildings.
- Typically, you’ll want to introduce yourself and tell students about what they’re going to hear about (the agenda). Maybe 3 minutes for this.
- If you’re doing a class of more than an hour, make sure that you schedule a break. You’ll find that attention wanders after about 45 mins. A break of 5 to 10 minutes is generally enough – allowing 15 tends to allow people to drift away.
- You’re probably going to need to allow some time at the end for Q and A, and for people to fill out their “smiley sheets” before they leave.
- You should allow a few minutes at the end for people to leave – some of them may have other appointments immediately after your class. I’d typically allow at least 3 minutes – 5 if you can spare it.
Enter the list of administrative matters and the time allowed for each into your Excel spreadsheet in lines A1 through A5 like this.
Note how the estimated time for this presentation is already 18 minutes, and you haven’t even started to add any of the topics!
Step 3 – The Main Topics
Think about the topics that you want to cover. Create a list of at least 6, but no more than 12, topics for each hour of training time that you have. At this time, resist the temptation to add lots of detail – if you have great ideas, write them down on a separate piece of paper. And don’t worry about the opening or closing sections. Include any interactive/group exercises as separate “topics” at this time.
Here’s an example. In a classroom course about passwords, I might want to cover:
- Why passwords are important
- Our password policy
- Three basic rules:
- Don’t use real words
- Use a mix of characters
- Make them as long as practical
- Ideas for creating strong passwords:
- Combine things that you like (or dislike?)
- Use letters from words in a phrase or saying
- Use a passphrase
- Handling passwords safely:
- change them frequently
- don’t write them down
- don’t “save password”
- don’t share passwords
- watch out for “shoulder surfers” and “social engineering” attacks
and I’d like to include a couple of group exercises. So my list of ‘topics’ – for the purpose of this planning exercise – looks like this:
- Why passwords are important
- Our password policy
- Three basic rules
- Ideas for creating strong passwords
- Handling passwords safely
- Exercise 1
- Exercise 2
Note that I haven’t attempted to assign times yet.
Copy these topics into lines T1 through T12, and E1 through E4 of your Excel spreadsheet like this.
Step 4 – Assigning Time – Your Topics
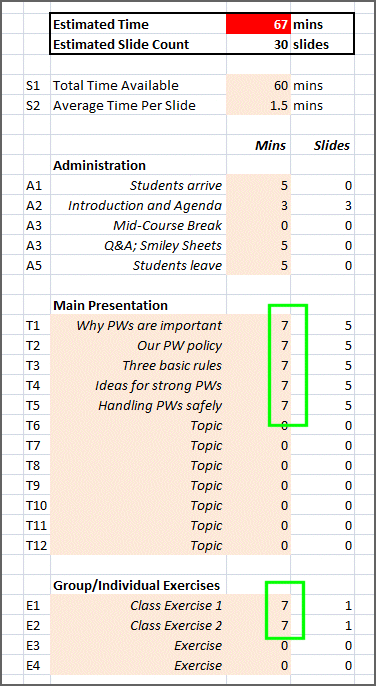
Start by dividing the available time up equally between the topics and exercises, and enter that value in the spreadsheet like this. No need to be exact at this time – you’ve got a lot of iteration left to do.
You can now go through the topics and adjust the time for each. Keep your eye on the ‘Estimated Time’ at the top of the sheet which will be displayed in red if you exceed the maximum time specified in Step 1.
As you go through, you’ll inevitably find that you don’t have enough time to cover everything in the depth that you think it merits. If this is the case, you can either choose to cover one or more topics in less detail than you’d like (and perhaps give students a handout with additional information?) or eliminate some topics entirely.
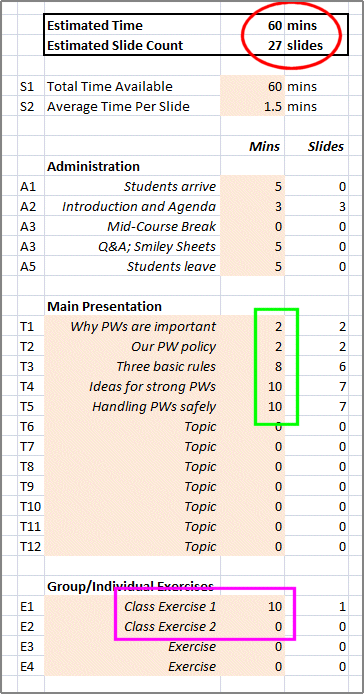
Eventually, your results may look something like this.
You’ll see that I’ve redistributed the time for the ‘lecture’ slides (green), and eliminated one of the class exercises so that I could spend a little more time on the other (pink). This results in an estimated time of 60 minutes – right on target – and about 27 slides.
What’s Next? Writing the Content
The estimates for the total number of slides, and the number of slides needed for each topic, are based on the number in line S2 of the spreadsheet. Some (most?) speakers take about 2 minutes per slide, but I’ve found that (for most courses) I take about 1.5 minute per slide because I tend to put relatively little content on each slide. So choose a number to suit your own presentation style.
You now have an outline plan, so you can go ahead and create blank slides in PowerPoint to act as a template for the actual writing. This will help you to avoid spending too much time on some topics, and not enough time on other topics. As for writing the content, you can either write your own, or you can contact emPower to talk about licensing our library of security awareness training content.
Final Notes
Note 1 – Training purists may frown and point you to more formalized design methodologies, but I’ve found that this is a quick and easy way to get started, and to generate a plan that give you a rough feel for what the final course will be like.
Note 2 – The above process describes how to create a skeleton for a classroom session. The process for outlining a web-based training class is a little different and I’ll cover that in another post.


